Miter Saw Cutting Inaccurate Angles: Fix It Fast
Incorrect blade alignment, loose parts, poor support, and bad measuring often cause inaccurate miter saw angles.
Miter saw cutting inaccurate angles can turn a clean trim job into a frustrating cycle of gaps, re-cuts, and wasted wood. Even a quality saw may cut poorly when the fence, table, blade, or bevel system is slightly out of alignment.
I have seen this problem in both quick home repairs and detailed cabinet work. The good news is that most angle errors have clear causes and practical fixes. This guide explains how to find the fault, calibrate your saw, make accurate cuts, and prevent the issue from returning.
Why a Miter Saw Cuts Inaccurate Angles
A miter saw makes accurate cuts only when several parts work together. The blade must be straight, the fence must be square, the table must be level, and the workpiece must stay firm during the cut.
When one part shifts by even a small amount, the error can grow. A one-degree mistake may seem minor on one board, but four corners in a picture frame can show a large gap.
Common causes include:
- A loose or damaged blade
- A fence that is not square to the blade
- Incorrect miter or bevel settings
- Dust under the workpiece
- Wood movement during the cut
- A dull or warped blade
- Poor support for long boards
- A bent arbor or damaged saw component
- Reading the wrong side of the miter scale
- Applying side pressure while cutting
Miter saw cutting inaccurate angles is often a setup problem, not a sign that the entire saw is defective. Check the simple causes first.

Check the Blade Before Adjusting the Saw
The blade is the first part to inspect because it controls the cut path. A blade that is loose, dirty, bent, or poorly installed can make every calibration test misleading.
Unplug the saw before touching the blade. Wear gloves when handling it, and follow the instructions in your saw manual.
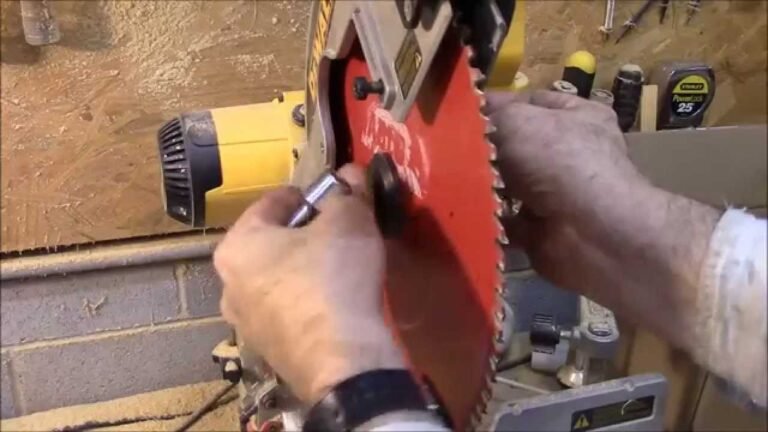
Inspect blade installation
Make sure the blade is seated fully against the arbor shoulder. The teeth should face the correct direction, and the washer and arbor nut should be installed in the correct order.
Do not overtighten the arbor nut. The saw’s rotation normally helps keep the blade secure, but the nut must still be tightened according to the manufacturer’s instructions.
Look for blade damage
Hold the blade at eye level and rotate it slowly. Look for:
- Bent teeth
- Missing carbide tips
- Pitch or resin buildup
- A warped blade body
- Uneven tooth wear
- A blade that wobbles during rotation
A dirty blade can cut poorly and may pull the workpiece. A damaged blade should be replaced, not repaired.
Choose the right blade
A fine finish blade with the correct tooth count often gives cleaner trim cuts. A general-purpose blade may work well for framing lumber, but it can leave rough edges in hardwood or molding.
Blade quality will not fix miter saw cutting inaccurate angles caused by a crooked fence. However, a poor blade can hide the true cause by adding vibration and tear-out.

Test the Miter Saw Fence for Square
The fence supports the workpiece and provides the main reference for a crosscut. If it is not square to the blade, the saw may show the correct setting while cutting the wrong angle.
Set the miter scale to zero. Raise the blade guard as directed by the manual, then lower the blade without turning on the saw. Place a reliable combination square against the fence and the flat side of the blade.
Keep the square away from the teeth. The teeth can be wider than the blade body and may give a false reading.
If the square touches both the fence and blade evenly, the fence is close to square. If you see a gap, adjust the fence according to the saw manual.
Some fences have two sections. Check each section separately. A small difference between the left and right fence can cause one side of a board to cut differently from the other.
After adjustment, make a test cut on scrap wood. Measure the cut with a square rather than trusting the scale alone.

Check the Miter Scale and Detents
The miter scale tells you the angle, but the scale is not always perfectly calibrated. Detents can also collect dust or wear over time.
Start by cleaning the detent plate and the area beneath the rotating table. Dust can prevent the table from locking fully into the zero-degree position.
Then check these points:
- Set the saw to zero degrees.
- Lock the miter table firmly.
- Place a square against the fence and the cut edge of a test board.
- Look for a gap along the square.
- Adjust the pointer or scale if the cut is not square.
Do not force the handle past a detent. If the table does not lock firmly, inspect the locking mechanism. A loose miter lock can move during the cut and create inconsistent results.
For accurate angled work, test the actual cut at 45 degrees too. A saw can be square at zero but slightly wrong at 45 because of wear, a damaged detent, or a scale problem.
Miter saw cutting inaccurate angles often appears when the saw is set to 45 degrees for outside corners. Always confirm the setting with a test cut.

Inspect Bevel Alignment
The bevel setting tilts the blade left or right. A bevel error changes the face angle of the cut and can create gaps in crown molding, trim, and compound joints.
Place the saw on a stable surface. Set the bevel to zero and check the blade against the table with a trusted square. The blade should stand at 90 degrees to the table.
If the blade leans, use the bevel adjustment points described in the manual. Many saws have a bevel stop screw or a stop plate that can be adjusted with a hex key.
Check the bevel lock after adjustment. The blade should stay in position when you apply light hand pressure. If it moves, the lock may need cleaning, tightening, or replacement.
A bevel error is easy to miss because the cut may look square on one face. Check both the table and the fence reference points before deciding that the blade is aligned.

Make Sure the Workpiece Stays Still
Even a perfectly tuned saw cannot make an accurate cut if the board moves. Movement is one of the most common reasons for miter saw cutting inaccurate angles.
The board should rest flat on the table and sit tightly against the fence. Remove sawdust from both surfaces before every precision cut.
Use the built-in clamp when suitable. For long boards, add stable supports so the board does not sag or twist. A sagging board can lift away from the fence near the cut line.
Keep your hands outside the marked safety zone. Never hold a small piece close to the blade. Use a clamp, stop block, or safer cutting method instead.
When cutting molding, place it in the same position it will have during installation. For example, crown molding may need to sit upside down and against both the fence and table. A correct saw angle can still produce a wrong joint if the molding is positioned incorrectly.
Use the Correct Cutting Method
Good technique reduces errors that look like calibration problems. Let the blade reach full speed before entering the wood, then lower it with steady pressure.
Avoid pushing the blade sideways. Side pressure can flex the blade, especially with a thin kerf blade. Let the teeth do the work.
For a clean cut:
- Mark the waste side of the board clearly.
- Support the board on both sides of the cut.
- Hold the board against the fence.
- Start the blade before touching the wood.
- Lower the blade smoothly.
- Release the trigger only after the blade clears the material.
- Wait for the blade to stop before raising it.
Do not cut bowed or twisted stock without first deciding how it should sit. The board may spring or shift when cut, changing the angle.
In my own shop, I once blamed the saw for a series of bad 45-degree cuts. The real problem was a long trim board resting on a low bench. It sagged away from the fence, so every cut was slightly off. Proper support solved the problem without changing the saw.

Use a Five-Cut Test for Better Accuracy
A five-cut test can reveal small miter errors more clearly than a single square test. It is useful when you need accurate frame joints or repeated angles.
Make a simple four-sided test frame from one board. Cut the four joints, then measure the final gap or error. The fifth cut trims one edge of the assembled test piece so you can measure how much error appears across a known length.
A larger error over a longer test edge makes a small angle problem easier to see. This test does not replace the manufacturer’s calibration method, but it helps confirm whether the miter setting is truly accurate.
For basic home work, a square and two test cuts may be enough. For furniture, cabinetry, or repeated production cuts, a five-cut test gives more useful information.
Miter saw cutting inaccurate angles becomes easier to diagnose when you measure the error instead of judging it by eye.
Diagnose the Type of Angle Error
The shape of the gap can provide a clue.
One corner is tight and the other is open
This often means the miter angle is wrong or the fence is not square. Recheck the fence and test the cut in both directions.
The joint is tight at the front but open at the back
The bevel may be incorrect, or the workpiece may not be sitting flat. Check the blade’s bevel position and remove dust beneath the board.
The first cut is good but later cuts drift
The miter lock may be slipping. Dust, a worn locking mechanism, or force applied during cutting can allow the table to move.
The cut face shows a curve or uneven line
The blade may be dull, bent, loose, or flexing. Replace the blade or have the saw inspected if the arbor appears to wobble.
Opposite frame corners do not match
The saw may have a small angle error, or the boards may have different lengths. Mark each piece and compare matching cuts before adjusting the saw.
Prevent Inaccurate Miter Saw Cuts
Regular care keeps small errors from becoming large ones. Clean the table, fence, and detent area often, especially when cutting resinous wood or composite trim.
Before important work, use a short checklist:
- Confirm the blade is tight and clean.
- Check the miter setting.
- Check the bevel setting.
- Clean the table and fence.
- Support long stock.
- Make one scrap test cut.
- Measure the test piece.
- Confirm the cut direction and waste side.
Store the saw on a firm, level surface. A portable stand is useful, but it must not rock when the saw head moves.
Replace blades when they become dull or damaged. Follow the saw manufacturer’s maintenance instructions, and do not bypass guards or safety switches.
If the blade continues to wobble after proper installation, stop using the saw. A bent arbor, damaged bearing, or other internal fault needs professional service.
When to Adjust, Replace, or Repair the Saw
Minor alignment changes are normal. Most users can safely adjust a fence, pointer, or bevel stop by following the manual.
Replacement is often the best choice when:
- The blade has damaged teeth.
- The blade body is visibly warped.
- The fence is bent.
- The miter lock will not hold.
- The detent plate is badly worn.
- The arbor has noticeable runout.
- The saw produces unusual vibration or noise.
Do not keep recalibrating around a damaged part. A saw that cannot hold its setting will waste more time and material than a proper repair.
For safety, unplug the tool before inspection and remove the battery from cordless models. If you are unsure about an internal repair, use an authorized service center or a qualified tool technician.
Frequently Asked Questions About Miter Saw Cutting Inaccurate Angles
Why is my miter saw not cutting square?
A crooked fence, loose blade, dirty table, or incorrect miter setting can cause the problem. Clean the reference surfaces, check the blade, and verify the cut with a reliable square.
Why are my 45-degree miter cuts not meeting?
The saw may not be exactly at 45 degrees, or the board may not be held firmly against the fence. Make test cuts on scrap wood and check both the miter and bevel settings.
Can a dull blade cause inaccurate angles?
A dull blade can increase vibration, flexing, and wood movement, which may make the cut appear inaccurate. It usually does not change the calibrated angle by itself, so inspect the saw alignment as well.
How do I know if my miter saw fence is square?
Unplug the saw and place a trusted square between the fence and the flat blade body. If a gap appears, adjust the fence and confirm the result with a test cut.
Why does my miter saw angle change during cutting?
The miter table may not be locking firmly, or the board may be pushing against the fence and moving the table. Check the lock, clean the detents, and use firm support without forcing the cut.
Should I calibrate my miter saw before every project?
You do not need a full calibration before every cut. However, check the setting and make a scrap cut before precision work, after moving the saw, or when the results look different.
Conclusion
Miter saw cutting inaccurate angles usually comes from a small setup or technique issue. Check the blade, fence, miter scale, bevel alignment, workpiece support, and locking mechanism in that order.
Use a square for basic checks and test cuts for real-world proof. Keep the saw clean, support long boards, and stop using it if you find serious wobble or damage. Apply these steps on your next project, then share your results or explore more tool-calibration guides for cleaner, tighter joints.