Air Compressor Leaking Air: Find And Fix Leaks Fast
Air compressor leaking air usually points to a loose fitting, worn seal, damaged hose, or faulty tank valve.
An air compressor leaking air can waste power, reduce tool performance, and create a safety risk if the problem reaches the pressure tank. The good news is that many leaks are easy to find and fix with a careful inspection, basic tools, and the right replacement parts. This guide explains how to locate the leak, identify its cause, repair it safely, and prevent it from returning.
Why an Air Compressor Leaking Air Needs Attention
A small leak may seem harmless, but compressed air escapes with force. The compressor must run more often to replace lost air. This raises energy use and adds wear to the motor, pump, valves, and pressure switch.
An air compressor leaking air can also cause:
- Slow tank fill times
- Low pressure at the tool
- Frequent motor cycling
- Excess heat from longer run times
- Loud hissing sounds
- Moisture and oil issues from poor system performance
- Reduced service life
In a workshop, a leak can affect more than one tool. A loose fitting near the tank may let pressure drop through the entire air system. Think of it like a small hole in a bicycle tire: the hole may be tiny, but the tire will not stay full.
A compressor that runs briefly after a tool is used may be normal. A compressor that starts every few minutes while no tool is connected is not normal. That pattern often signals an air leak or a pressure-control problem.
Common Causes of an Air Compressor Leaking Air
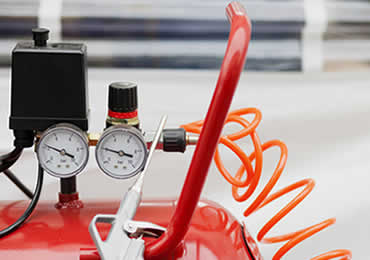
Several parts can cause an air compressor leaking air problem. Finding the exact point matters because tightening the wrong part can damage threads or create a new leak.
Loose fittings and threaded connections
Pipe fittings can loosen because of vibration. This is common around the tank outlet, pressure switch, regulator, drain valve, and quick-connect coupler.
Thread sealant may also wear out. Teflon tape can split, shift, or fail when it is applied in the wrong direction. Too much tape may enter the air passage and damage a valve.
Worn air hoses
Air hoses bend, drag across floors, and rub against sharp edges. Over time, the outer cover may crack while the inner tube loses its ability to hold pressure.
A hose may leak near the connector even when the middle looks perfect. Flex the hose gently while listening for a hiss, but never hold a damaged hose against your skin under pressure.
Faulty quick-connect couplers
Quick-connect couplers often leak when their internal seal wears out. Dirt and metal dust can also prevent the plug from seating correctly.
If the leak stops when you move the plug, the coupler or plug is likely damaged. Replacing the coupler is usually safer than trying to repair its internal spring and seal.
Tank drain valve leaks
The drain valve sits at the lowest point of the tank. It removes water that collects from condensation. Because it is exposed to moisture, rust, and dirt, it is a common source of an air compressor leaking air.
A drain valve may leak from its threads or through its closed tip. Never ignore this area. A faulty valve can allow pressure to escape and may become harder to open later.
Pressure switch or unloader valve problems
The pressure switch controls when the motor starts and stops. The unloader valve releases pressure from the pump discharge tube when the motor stops. This helps the motor restart without heavy resistance.
A brief hiss after shutdown may be normal. A steady hiss that continues for more than a few seconds can indicate a faulty unloader valve, check valve, or pressure switch connection.
Tank check valve failure
The check valve allows air to flow into the tank but prevents it from flowing back toward the pump. If it fails, air may escape through the unloader system.
This problem often appears as air leaking near the pressure switch after the compressor shuts off. Cleaning may help in some cases, but replacement is often the proper repair.
Tank corrosion or a pinhole
A steel tank can rust from water that remains inside it. A corroded tank may develop a small hole or a weak area.
Do not weld, drill, patch, or braze a pressurized air tank. A damaged pressure vessel can fail suddenly. If you see rust pitting, a crack, or a leak from the tank shell, stop using the compressor and have it inspected or replaced.

How to Find an Air Compressor Leaking Air
You can locate many leaks without special equipment. Work slowly and inspect one area at a time.
1. Turn off the compressor
Switch off the compressor and unplug it. Allow hot parts to cool before you inspect the unit.
If the compressor has stored pressure, follow the manufacturer’s instructions. Never remove a fitting or valve while the tank is pressurized.
2. Listen for a hiss
A quiet room makes a big difference. Stand near the tank, hose, couplers, regulator, and drain valve.
A leak may sound like:
- A steady hiss
- A soft whistle
- A faint bubbling sound
- A short burst after shutdown
Some leaks are too small to hear. Continue with a soap solution test.
3. Apply soapy water
Mix dish soap with water in a spray bottle. Apply it to fittings, valve stems, couplers, hose ends, and the drain valve.
Bubbles that grow or keep forming show the location of an air compressor leaking air. A few bubbles caused by the spray itself do not prove there is a leak. Watch for new bubbles that expand over time.
4. Check the pressure gauge
Fill the tank to its normal shutoff pressure. Turn off the power and record the gauge reading.
Wait for 10 to 15 minutes without using an air tool. A pressure drop suggests a leak, although temperature changes can also affect the reading. Test the compressor at room temperature for the clearest result.
5. Inspect the air path
Follow the air path from the tank to the tool:
- Tank outlet
- Shutoff valve
- Regulator
- Filter
- Quick-connect coupler
- Hose
- Tool inlet
Testing each section separately helps you avoid replacing parts that are still good.
A lesson I learned from troubleshooting shop equipment is to begin with the cheapest and most visible points. Many people replace a regulator when the real problem is a loose drain valve or worn coupler.

How to Fix an Air Compressor Leaking Air
The correct repair depends on the leak location. Always release pressure and disconnect electrical power before removing parts.
Tighten a loose fitting
Use two wrenches when tightening a threaded connection. One wrench supports the fixed part, while the other turns the fitting. This prevents stress on the tank outlet or manifold.
Do not overtighten. Excess force can crack aluminum parts or strip threads. If the fitting still leaks, remove it, clean the threads, and apply a sealant approved for compressed air.
Reseal threaded connections
For tapered pipe threads, use a suitable pipe sealant or compressed-air-rated PTFE tape. Wrap tape in the direction of the thread so it does not unwind as you install the fitting.
Keep the first thread free of tape. This reduces the chance of loose tape entering the air passage. After installation, pressurize the system and repeat the soap test.
Replace a leaking hose
Replace a hose if it has cuts, deep abrasions, bubbles, severe cracks, or a damaged connector. Do not rely on electrical tape or duct tape as a pressure repair.
Choose a hose with:
- A pressure rating above the compressor’s maximum pressure
- The correct inside diameter
- Compatible fittings
- A suitable temperature rating
- A length that avoids sharp bends
Do not pull a hose by its coupler. This habit places stress on the connector and can lead to another air compressor leaking air problem.
Replace the drain valve
Release all tank pressure before removing the drain valve. Clean the threaded opening and install a new valve with suitable thread sealant.
Open the drain valve after each work session, unless the compressor has an automatic drain system. This removes water and helps limit internal corrosion.
Replace a quick-connect coupler
A leaking coupler is usually replaced as a complete part. Match the plug and coupler profile, pressure rating, and thread size.
After installation, connect and disconnect the plug several times. The connection should lock firmly without excessive movement.
Service the check valve or unloader
If air escapes from the pressure switch area after shutdown, the check valve may not be sealing. The unloader may also be stuck or damaged.
These parts vary by compressor design. Use the correct replacement part from the manual or a qualified parts supplier. If the system repeatedly trips the breaker or struggles to restart, stop testing and arrange professional service.

When an Air Compressor Leaking Air Is Dangerous
Not every leak requires emergency action, but some conditions should end the inspection at once.
Stop using the compressor if:
- Air leaks from the tank wall or welded seam
- You see deep rust, bulges, cracks, or heavy pitting
- The pressure gauge behaves erratically
- The safety relief valve opens without a clear reason
- The compressor overheats or smells like burning insulation
- The motor cycles rapidly
- A hose is swollen or badly damaged
- The unit has suffered impact or fire damage
A safety relief valve is not a substitute for repair. Never block it, remove it, or install one with a higher pressure rating.
Pressure vessels store significant energy. Even a small tank can release that energy quickly if it fails. A damaged tank should be replaced, not patched.

How to Prevent an Air Compressor Leaking Air Problem
Good maintenance can prevent many leaks before they become expensive.
Drain moisture often
Warm compressed air creates condensation inside the tank. Drain the tank after use or follow the service schedule in the manual.
Open the drain slowly and direct water away from electrical parts. If the water looks rusty, inspect the tank more often and consider professional evaluation.
Inspect connections each month
Check fittings, hose ends, couplers, gauges, and valves. Look for corrosion, movement, worn seals, and damaged threads.
A monthly soap test is useful in busy shops. It can find a small air compressor leaking air problem before the compressor begins running nonstop.
Avoid excessive pressure
Use the lowest pressure that completes the job. Higher pressure increases stress on seals and connections and may reduce tool life.
Follow the pressure rating on the tool, hose, regulator, and accessory. The weakest component sets the safe limit.
Keep couplers clean
Wipe plugs before connecting them. Keep open couplers covered when they are not in use.
Dirt can damage the internal seal and allow air to escape. A few seconds of cleaning can prevent repeated replacement.
Reduce vibration
Make sure the compressor sits on a stable surface. Use the manufacturer’s recommended feet or vibration pads.
Do not allow rigid pipes to pull on the tank outlet. Support long pipe runs and leave enough flexibility near the compressor.
Replace worn seals during scheduled service
O-rings, valve gaskets, and drain valve seals wear with age. Replace them when the service schedule calls for it or when inspection shows damage.
Keep a simple repair log. Record the date, pressure behavior, leak location, and replacement parts. This makes recurring faults easier to trace.

Air Loss, Energy Use, and Operating Costs
An air compressor leaking air can cost more than the replacement fitting. Compressed air is expensive because the motor must use electricity to create and maintain pressure.
The exact cost depends on compressor size, pressure, electricity rates, and leak size. A small leak at high pressure may waste more air than a larger leak at a lower pressure.
You can estimate the problem by tracking compressor run time:
- Let the compressor reach its normal shutoff pressure.
- Disconnect all tools.
- Note how long it takes for the motor to start again.
- Repair the suspected leak.
- Repeat the test.
If the motor runs less often after the repair, the system is holding pressure better. Industrial facilities may use ultrasonic leak detectors, but a soap solution works well for many home and small-shop repairs.
Do not confuse normal compressor cycling with a leak. Some compressors lose pressure as air cools after filling. Compare readings under similar temperature conditions before deciding that a major fault exists.
Mistakes to Avoid During Repairs
Repairing an air compressor leaking air problem is often simple, but rushed work can create new risks.
Avoid these common mistakes:
- Removing fittings before releasing tank pressure
- Using random tape or sealant not rated for air systems
- Tightening aluminum fittings until they crack
- Repairing a damaged hose with tape
- Plugging or adjusting the safety relief valve
- Welding or patching the tank
- Ignoring rust around the tank base
- Installing mismatched quick-connect parts
- Testing a leak with your hand
- Running the compressor without its guards
Never search for a high-pressure leak with your fingers. Air can enter cuts or puncture skin. Use your ears, soapy water, or a proper leak detector instead.
One practical mistake is testing only while the compressor runs. Some leaks appear after shutdown, when the tank holds its highest pressure. Always test both during operation and after the motor stops.

Frequently Asked Questions About Air Compressor Leaking Air
Why is my air compressor leaking air when it is turned off?
A leak after shutdown often comes from the drain valve, check valve, quick-connect coupler, or a threaded fitting. Apply soapy water to each area and watch for growing bubbles.
Is it normal for an air compressor to hiss after it shuts off?
A short hiss from the unloader valve can be normal because it releases pressure from the pump discharge tube. A steady hiss that continues may indicate a faulty check valve or unloader system.
Can I use Teflon tape to stop an air compressor leak?
PTFE tape can seal suitable tapered pipe threads when applied correctly. Do not use it on damaged threads, compression fittings, or parts that require an O-ring seal.
How do I know if the compressor tank is leaking?
Drain and depressurize the compressor, then inspect the tank for rust, cracks, bulges, or wet spots. If air escapes from the tank shell or weld seam, stop using the compressor and replace or professionally assess the tank.
Why does my compressor keep turning on and off?
Frequent cycling can result from an air compressor leaking air, a faulty pressure switch, an undersized tank, or high air demand from the tool. First disconnect all tools and test whether the tank loses pressure while idle.
Can I repair a hole in an air compressor tank?
Do not patch, weld, drill, or braze a pressurized air tank. Tank damage can lead to sudden failure, so replacement or inspection by a qualified professional is the safer choice.
Will a small air leak damage my compressor?
A small leak makes the compressor run more often, which increases heat, motor wear, and electrical use. Repairing the leak early is usually cheaper than replacing an overheated motor or pump.
Conclusion
An air compressor leaking air usually comes from a loose fitting, worn hose, faulty coupler, drain valve, check valve, or damaged seal. Find the leak with careful listening, a pressure-loss test, and soapy water. Tighten or replace simple parts, but never repair a damaged pressure tank or ignore a safety valve problem.
Make leak checks part of your routine maintenance. A few minutes of inspection can protect your equipment, lower energy use, and keep your tools working at full pressure. Share your experience or explore more compressor maintenance guides to keep your air system safe and reliable.